Some links specifics:
- You can create a link that will look like a link and can be clicked, but if the address is wrong, or to a missing page, then you have a "broken link". Many of you have already experienced these in your critiques of web sites.
- As I mentioned before, the default color for a link is blue (and after you've visited the link -- purple). If you include blue text on your page that is not a link, your visitors will be very confused. And (even though you can and may want to for a special reason) if you change these default colors [say yellow for the link, and red if visited] you run the risk of confusing the visitors. Did anyone think about trying the "red" link in the Assignment commentary? (It wasn't a link, just an example, but it could have been) It just didn't enter your mind, did it? (We'll discuss colors in the next lesson)
- Attributes (which we will discuss more fully in Tables) should be preceeded by a space. **Note -- it looks like there is a space before the # in the first example of a link within a page <a href="curriculum.html #science">. The # is not an attribute, and , as you see in the remaining examples, there should be no space before it.
-
When you "name=..." a part of a page as an anchor, whatever is between the tags
will display at the very top of the screen. You might want to add a
<p> tag to drop the next information a little from the edge of the screen.
**Note -- I have used a name tag such as <a name="bike"><br></a>
to go to a section of the page when I didn't want to have text displayed at the
anchor point. The <br> tag replaced the text.
[Please note the differences between the "name" and "href" in these tags.] - Many people have not, and may not know how to, set the preferences in their browsers. I highly recommend that you always include the full e-mail address as the link on a mail-to tag. Then a visitor could copy and past the address into their own e-mail program.
- Link menus -- take a look at the class page at http://www.heyray.net/webdesign/index.html and view source. This is an example of 2 link menus.
- For an example of the practice pages for this lesson you can go to my example. Remember, that this is just an example! And, also please notice that I did nothing to the first page (from Assignment 2) except add the link to practice2.html. You only have to create practice2.html -- you do not need a new first page.
-
Absolute/Relative Pathnames
An Absolute pathname uses the full url and sends the browser on its search through each piece of the url. This is another reason to use relative pathnames within your site. Why send the browser back to the same server, same www folder, same index.html, etc.
Relative pathnames send the browser to another page "in relation" to the current page. This means that these pages must be on the same server (but they do not have to be in the same folder). There are three relative pieces that you need to know:
- Folder or page name -- This will open the folder or page on the "same level".
- / -- The slash tell the browser to look for the next name "inside" that folder.
- .. -- The two periods tell the browser to move up one level in the hierarchy, then look for the folder/page name on that level.
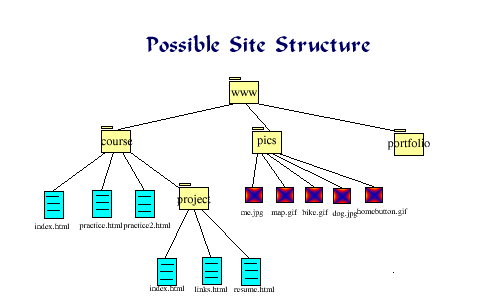
I am on the practice.html page in the course folder. I want to link to the practice2.html page. Being in the same folder and on the same level, my link would simply be the page name:
<a href="practice.html">Now I want to go from practice.html to the resume.html page. I will need to move "over" to the project folder (notice that there is no .html suffix on a folder name) which is also in the course folder, then go "inside" the project folder to the resume.html page. The link code would look like this:
<a href="project/resume.html">And finally, for the tricky one. I'm on the resume.html page and I want to include my headshot, which is the me.jpg in the pic folder (we'll do more with images later, including their attributes, but this will work as a relative pathname example). First I move "up" 1 level to the project folder, then move "up" again to the course folder, then "over" to the pics folder on that level, and finally "inside" the pics folder to the me.jpg image. Here's the relative pathname from resume.html to me.jpg:
<a href="../../pics/me.jpg">Is it making sense?
I hope these comments will help to follow and create those relative pathnames.